How To Secure Server Access Via Cloudflare Zero Trust & WARP
Secure connection to your server and services with Cloudflare Zero Trust and WARP, eliminating the need to open SSH or other ports.
Needless to say - you shouldn’t use passwords for your SSH connections. Why? Is there a reason not to use an SSH key pair?
In case you must/want to use it or you want to remove your SSH port from the server and therefore public internet, I’ll show you how you can SSH into your instance without port 22, through a VPN. It’s all free and if you ask me - pretty cool!
What do you need?
A publicly accessible server (virtual or physical, doesn’t really matter)
If you don’t have an instance ready and would like to try this out, there are a lot of options, but notable free ones include: AWS Free Tier, Azure Free Tier, Oracle Free Tier
Cloudflare Account
Zero Trust
WARP Client
How does this work?
Let’s take a look at the following diagram:
cloudflared - this is installed on the server and proxies the traffic through Cloudflare to the origin (your device in this case).
Cloudflare Zero Trust - a security framework that allows you to set access rules to services that you want to protect. It ensures that devices are trustworthy before allowing access.
Cloudflare WARP is a part of Zero Trust. When WARP client is connected, it allows you to access services that you secured with Zero Trust.
You can download it from the Zero Trust portal by going to the: Settings → Downloads
After everything is in place, you will be able to connect to your machine using its private IP, but only while connected to the WARP client. Zero Trust will prevent access otherwise.
That being said, there is no more need for keeping port 22 open/accessible.
Note: While connected to the WARP client, you will be able to access everything on the machine even if your firewall/security group is preventing access as everything will be routed through cloudflared and Zero Trust. You can still allow access from the public internet by opening ports in your firewall/security group.
How to do it?
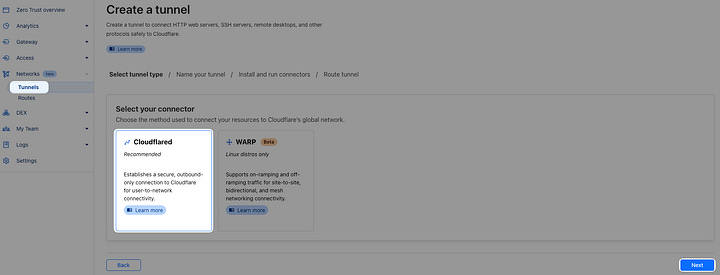
1. Create a tunnel in Cloudflare Zero Trust
Login to your Cloudflare account, or create one
Go to Zero Trust
Networks → Tunnels → Create a tunnel
Select Cloudflared → Next
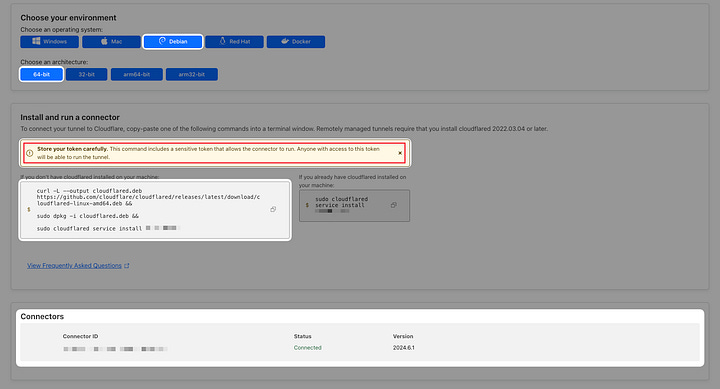
Set a name
Select OS and architecture of your server
Copy and run the commands shown
Wait until you see your tunnel is connected
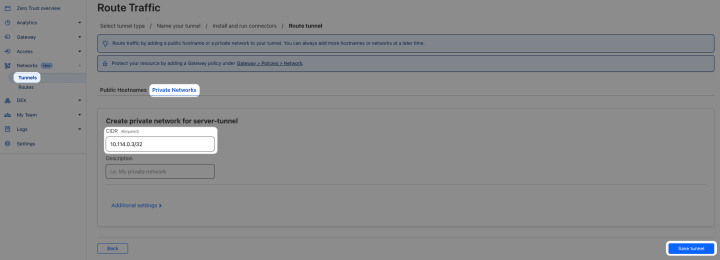
Select Private Networks
CIDR
Type in the private IP address of your server (or a range that includes your server private IP - /32 or lower)
For example, if your server private IP was 10.0.2.3 - you’d need to write 10.0.2.3/32 or a range - e.g. 10.0.0.1/16 would work too
Description if you’d like
Save tunnel
Here are some images to help you out:
Note: For this setup, I am using Ubuntu 24.04 (LTS) x64 system.


One more thing - remember that you configured Cloudflare tunnel with a private network CIDR? Let’s now check split tunnel settings because, by default, WARP excludes traffic to/from IP address ranges reserved for private networks:
10.0.0.0/8 (10.0.0.0 - 10.255.255.255)
172.16.0.0/12 (172.16.0.0 - 172.31.255.255)
192.168.0.0/16 (192.168.0.0 - 192.168.255.255)
Go to Cloudflare Zero Trust portal
Settings → WARP Client → Device Settings
Select Default profile name
Edit → Scroll down → Split Tunnels
Check which option is selected → Manage
If Exclude… is selected, find CIDR that includes your tunnel’s CIDR and delete it from the list
If Include… is selected, add your tunnel’s CIDR to the list
Note: If you do have a service on your local network that is running on the same IP address as your (cloud) server, it will not be accessible anymore as traffic to that IP will now be routed through WARP client and Cloudflare Zero Trust.
2. Install and setup WARP client
Install WARP client
Once it is running, open settings
Go to Account tab
Login to Cloudflare Zero Trust
When it prompts you on the team's name, if you don’t know it you can find it in the Zero Trust dashboard: Settings → Custom Pages → Team domain. Your team's name is the subdomain there.
<team_name>.cloudflareaccess.com
3. Test it out
Check your server firewall/security group. Feel free to disable all incoming connections.
Open WARP client on your device
Connect
Open your shell/ssh connections manager app
Connect to your server via ssh protocol and public IP address
Not working. If it is working, disable your ssh port.
Now try the same with the private IP address. It will work if you set everything up.
That’s it!
Now, your machine is accessible only while connected to the WARP client, over the private IP address unless you allow a port to be accessible from the public internet.
You can also test it by running the nginx service on your machine, or anything else that needs an open port. Try accessing <server_private_ip>:<port> in your browser. You should be able to see your server’s nginx welcome page while connected to your Zero Trust (Cloudflare) account through WARP client.
Or try to ping your servers’ private IP from your device. You will see the packets transmitting. While your WARP client is in the connected state, your (cloud) server will be accessible as would any other server be on your local network.
This way, you can protect your server ports from public internet - for free! SSH Connection? Private DNS instance? Private Minecraft server to play with friends? A bit more work but easy enough to set up. Will probably try this out myself.


