How to configure verified GitHub commits?
NOTE: In this blog post, it will be explained how to sign commits on GitHub, with Windows. For other git hosts, please refer to their documentation.
Why should you sign your commits?
First off, let’s see what is git’s default behavior.
Git’s default behavior
By default, git commits have two properties:
- user. email — this email is also used so that GitHub can link commits with your account and show you those shiny green squares :)
- user.name — this is the name that will be shown in a commit info
Git doesn’t verify the info you put into those properties, it just assumes they are right until you set commit signing.
What does↑ this↑mean?
Someone else can set those parameters as yours, and git will just push it remotely (there are certain repo settings you can set, but I’m talking about default behavior), without any checks.
It will show like you committed, with a picture and your email, but you didn’t! So, basically, anyone can set their user.email or user.name to yours, and it will look like you made the commit.
How to prove it is really you?
You can utilize software called GPG (GNU Privacy Guard). It allows you to create public-private key pairs, and encrypt/sign the data.
It is important to understand public-private key pairs.
What are public-private keys in terms of encryption?
The public key is a public one (wow). No, seriously, you can share this key with everyone. It’s mainly used by someone else, so they can encrypt the message, and send it to you. Then, you decode and read it with your private key.
The private key is a private one (another one). It’s like a password. Noone, except you, should ever be able to get it. It’s used to decrypt data, and leaking/exposing it would present a fatal flaw.
How to Sign Commits in Git(Hub)
Prerequisites
You can verify if GPG is already installed by running the following command in the terminal:
- gpg — version
Generating a new GPG key
- Download and install GPG command-line tools for your operating system.
- Open terminal.
- Generate a generate an RSA key pair with the following command:
- gpg --full-generate-key
- Select what kind of key you want.
- We will use RSA key pair, default one, so you can just press Enter to advance.
- What keysize do you want?
- Although you can use stronger, 4096 is good, press Enter.
- Key is valid for?
- I will just press Enter which will select default (0 — doesn’t expire)
- Then, input your information.
- NOTE: When asked for an email, make sure to input the primary email for your GitHub account! You can also use your no-reply GitHub provided an email address, if you have your privacy settings on.
- Now you need to set a secure passphrase.
- NOTE: You can also just press OK with blank fields, but it is recommended to use a password for your encryption! Keep in mind that you will have to type in a passphrase at each commit (it has some time window, but you get the idea)
Copying generated key
- Use the following command to list the long-form of GPG keys
- gpg --list-secret-keys --keyid-format LONG
- Copy the long form of your key ID, from the list.
- Find the long form of your key after >4096R/<

- Show your public key with the following command:
- gpg --armor --export 42653CC58CD62E74
- NOTE: Use your own key after --export part
- Copy your GPG key, beginning with:
- -----BEGIN PGP PUBLIC KEY BLOCK -----
And ending with:
- -----END PGP PUBLIC KEY BLOCK -----
Adding your key to GitHub
- Go to your settings
- In the settings sidebar, go to SSH and GPG keys
- Click on New GPG key
- In the ‘Key’ field, paste copied public key
- Finish with clicking on Add GPG key and confirm your password (GitHub account password, not the passphrase)
NOTE: Check if the Key ID on GitHub is the same one as the Key ID you copied earlier:

If it’s not, you did something wrong. If you need help, don’t hesitate to comment down below!
Configuring Git on your local machine
We will modify the .gitconfig file, so this will work for any instance for Git on your windows machine.
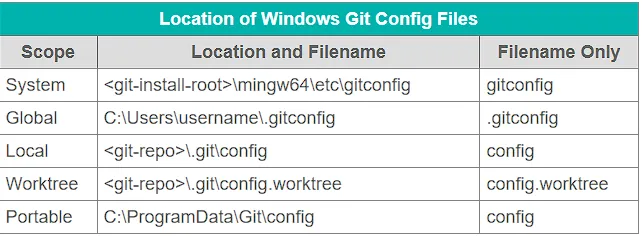
The global scope will suffice in this case, navigate and open the .gitconfig file with any editor (I am using Notepad++).
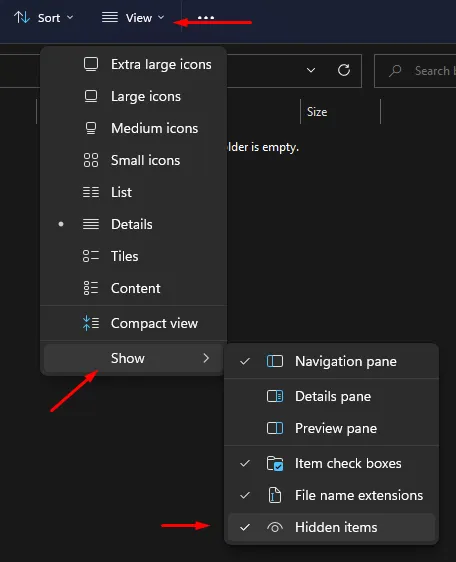
- NOTE: If you don't see the .gitconfig file, you probably have to enable showing hidden files on Windows (I am using Windows 11):
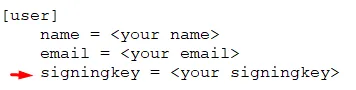
- Add Key ID from before:
- Add the GPG section which will point to gpg binary you used for generating a key:

- NOTE: I had problems with only ‘gpg’ or single back-slashes. The method from the picture should work on every Windows 11 machine.
- Add commit section which will tell git to sign every commit:

That’s it! Now you are able to push signed commits!
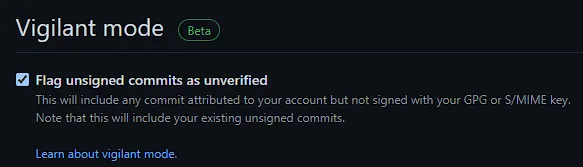
Vigilant Mode
If you want to go further, this option will mark every commit youdidn't sign as Unverified.